
|
|
| |
|
| lights | mtb video | rides | links |
[ parts ] [ battery mount ] [ what I did ] [ globe quality ] [ light links ]
There I was, happy as a pig in ...err... well, happy, my mkIV's working a treat and looking good to boot - I thought my model changing days would slow down. Then the inspiration happened - an email from Jim Robertson in the States. He'd seen my web page and we exchanged emails for a bit, discussing the very impressive digitally controlled system he'd designed. Jim offered to send me a circuit board to test, so I jumped at the chance, becoming an official LightBrain beta tester.
Jim sent me a Universal Controller circuit board and wiring diagram (which he now sells complete, in cheaper kits, or as plans), I provided a housing for the board, the lights, wiring, switch, connectors and battery.
Housing
The board needs to be kept dry and free from dust so a good housing is a must. I really scratched my head over this one - Jim recommends a particular container I'd never heard of, and I didn't like the look of the housings I saw in Jaycar and Tandy. Besides, surely I could come up with a free or dirt cheap housing...
I'd found and discarded a number of containers - the only one that was a good size was too brittle - when suddenly the light bulb went on - a film container! I raced inside, found my camera and an old Kodak 35mm film canister. The canister looked like it would be just the right size for the board, but proved to be a couple of millimetres too short. As the circuitry doesn't go near the edges of the board, I decided to trim the length and round off the board's corners just a touch. I VERY carefully ground the edges, just enough for the board to fit in the canister with the lid shut properly.
Other brand film canisters may work as well or better, but the only one I had was smaller than the Kodak.
Unlike the mkIV's, you have to break out the soldering iron to connect the LightBrain into the system. Follow Jim's wiring diagram and you won't have much trouble.
| # | Description | $Oz |
| 1 | bike - you should already have this... | ?? |
|
2
|
12V 20W 12 degree spread halogen globes - better quality = more light for same battery drain (note on globe quality) | $6.05 ea |
|
1
|
LightBrain Universal Controller | $US24.00 |
|
2
|
ceramic clip on connectors | $2.75 ea |
|
2
|
radiator hose clamps (to wrap around bars) | $1.60 ea |
|
2
|
radiator hose clamps 8-22 mm (to wrap around back of globe - thinner width) | $1.60 ea |
|
2
|
female spade connectors | $1 or so |
|
1
|
roll wire - neater if you use the sort that's like two wires stuck together (technical term!) | $5 or so |
|
1
|
battery - cost depends on type & capacity - 7ah SLA "brick" |
$25 to $39.95 |
|
1
|
charger - cost depends on model | $20 up |
|
4
|
rubber strips (go under hose clamps) - old inner tube | free |
| 1 | switch | $1.95 ea |
| 1 | switch mount - could be hose clamps, tape, zip ties etc - I use tape for the mkV | $2 or less |
| 1 | battery mount - be inventive! | ?? |
| can | heat resistant paint (optional but recommended) | $7 |
| tube | shrinky dink (heat shrink) tube (optional) - I had leftovers | $5? |
| 1 | fuse link (optional but recommended) | $3 |
Of course, you could just use some of these ideas and reduce the cost further and you may have some bits lying around at home already. Even if you have to buy all the parts, you should be able to build up an excellent set of digital lights, including battery and charger, for around $Oz150. I still haven't seen bright ordinary commercial lights in Australia for under $200, and certainly not digital models.
Where to get the parts
Most parts will be available at electrical wholesalers or retailers such as Jaycar, Dick Smith and Tandy. Oatley Electronics also seem to be a good online source - especially for the batteries. Radiator hose clamps can be picked up at any servo and many department stores, who also sell spray paint. Shop around!
Tools:
you'll need:
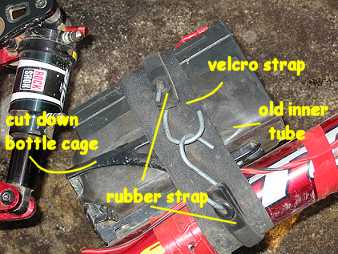
I've seen a variety of home made battery mounting solutions, I use a modified Cateye bottle mount and secure the battery to the mount and frame with a rubber battery strap off an old motorbike and zip ties. My mate Hodgie straps his to his rack - and don't write off the humble backpack or bumbag.
I reckon the location of my mount is excellent - protected from rocks by the frame, and close to the centre of gravity so it doesn't upset the handling too much. However, I've got an older triangle type frame - there's nowhere on a lot of modern bikes to easily mount a battery close to the centre of gravity.
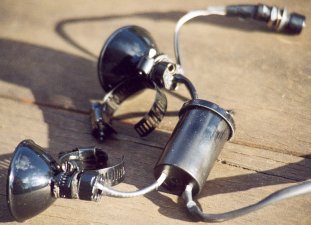
the controller canister sits across the headstem, just
behind the lights
Disclaimer: Although these lights work for me, I'm not an electrician, just this bloke who likes to tinker. Riding mountain bikes is dangerous, and even more so at night. Remember to ask your mother if you want good, sensible advice, because you won't get it from me...
So what did I do?
The mkV's are basically the mkIV's with the addition of the controller board. In fact, I simply converted my existing mkIV's one night.
To briefly recap, the mkIV's are the simplest design I've made to date, consisting of globes, ceramic clips, wiring, connectors and hose clamp mounts. I won't go into the details again here - all the info you need is on the mkIV web page.
After trimming the circuit board to fit the film canister, I drilled holes in the lid and base for the wiring, then poked the ends of the wire to be soldered to the board through the holes. Once I soldered the wires in place, I just popped the canister lid on, and put some dabs of silicon sealant around the holes to keep out water and dust. Done.
I did put shrinkydink tube around the wire before soldering, but I don't think this is necessary with the right wire - next time I won't. The wire I use is joined together anyway, and the shrinkydink has just made them stiff and inflexible, so it's harder to fit the system on the bike.
The globes mount on the bars with the hose clamps, exactly the same as the mkIV's, and the controller sits across the headstem behind them. At present, I'm using elastic bands to hold it on, but an O ring or zip ties would be neater. Don't forget you can really mount the controller anywhere, as long as you have enough wire.
the picture probably explains it better
In use, the LightBrain has been a delight, from freaking out my mates in disco
mode (emergency strobe), to grinding away up hills using only 7W For just pootling
along, I'm finding 10W is plenty, meaning I have tons of battery power in reserve
for when I really need bright lights, such as screaming into Deadman's Corner
down Redwire, BMX hill at over 60kmh, or hitting the singletrack at speed. I've
found my battery isn't as flat when I get home, so the controller should give
me a side benefit of extended battery life, or even better, I might get away
with a smaller and lighter battery. YES!
The LightBrain is an excellent addition to the mkIV's. The mkV's are definitely
harder to make than the mkIV's, but the effort is very rewarding.
The issue of globe
quality has reared its ugly head. When I was building the Mk IV's, I used
one old and one new globe, and I was disappointed to note the new globe doesn't
appear to have the same quality of light output as the old. The old globe
is considerably heavier, with much thicker glass and the reflector coating also
seems "denser". The new globe came from Jaycar, and was just one of their
standard offerings. The old globe was branded EYE and I bought it from
a lighting warehouse - about $15 or so compared to $5.50 from Jaycar. I've
compared an older Jaycar globe with the newer one as well, and the older Jaycar
was much better than this particular one.
I've since bought a better quality globe from an electrical wholesaler - John
R Turk was the wholesaler I used, but only because they happen to be in my area.
They stocked Thorn brand globes, which are heavier glass and have a better reflector.
This globe has much, much, much more light output than the last ones I bought
from Jaycar, and is almost identical to the original old globe. The best news
is that the good quality globe was still only $6.05. Bargain.
I think the cheaper globes are just a bit inconsistent - some will be really
good, some not so good - it's easier to buy quality to begin with.
Don't
waste your money on low quality globes!

![]()
another
fAt hIpPy production