
|
|
| |
|
| lights | mtb video | rides | links |
Having seen a number
of other home made lights, I decided it was time to upgrade my
original el cheapos, but I was determined to keep the cheap and bright theme
going.
The mk II's
never got past the under construction stage, being quickly superseded by the
MkIII's, so there aren't any pix. These really just
prove that possibilities are endless - I even know one bloke who uses a bit
of baby's bottle for a housing!! Text version for printing
I left my existing light as is (it'll be upgraded in the Mk III version...)
and went shopping: STOP PRESS!! The MK III lights
are now up!!!
Globe - 12V 20W 12 deg 51 mm spotlight - Jaycar
$4.95
Switch - Jaycar $2.95
Wiring - leftovers in The Pit
Shrinkydink tube - leftovers again $ I forget,
but not much at Jaycar etc.
Housing
This time I was going for 2wo
lights. The intention was to have a general riding broader beam, and a spotlight
high beam for the f-a-s-t
or difficult
stuff.
 |
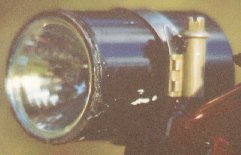
(wow, a housing!!) - cheap as I am, my beta housing was a small black seedling pot I found in The Pit - I had actually bought a black towball cover for the job ($2.40) but found that although it was supposed to be for a 50 mm towball, the internal diameter was around 53 - 54 mm, so the globe just didn't fit properly. The towball cover didn't go to waste, as you will see. |
After breaking the pot on my first test, I decided I needed something sturdier, I headed down to my local BBC Hardware's plumbing section. The PVC 50 mm joining pipes looked good, but were very thick and heavy, so in the end I settled on a lighterweight sink drain pipe, which I was able to cut into four pieces (4 housings!) with enough left over to use to position a globe in the towball cover. Now I had 5 sturdy housings. The pipe was $8.45, and I reckon I overpaid as I bought the extra bits I had to cut off - you could probably do better in a shop with more options. So that's $10.85 for five housings - pretty CHEAP.
I had some leftover gloss black spray paint in the Pit, so I used that to get rid of the plumber's apprentice look.
Mount - two radiator hose clamps - rattling around in the toolbox
Wire connectors - $0.60 + leftovers
Silicon sealant - leftovers
So far I'd outlaid less than $20 - I was still going to use the existing light, so wouldn't be buying another battery or charger.
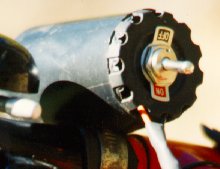
First, I drilled a hole for the switch in the side of each section of tube, then I drilled another hole for wiring to come out (I wanted to plug the end for safety and aesthetic reasons).
Then, I soldered the wiring onto the globe (next time I'll buy the special ceramic clips, as the globe isn't held in at the contact end), and soldered the switch into the positive wire.
I then fitted the globe into the end of the pipe - the globe protrudes slightly from the pipe as the pipe is marginally narrower, so I cut a bevel on the inside of the pipe to recess it a bit more, although it still sticks out a little. Next I used the leftover silicon sealant to cement the globe in place.
 |
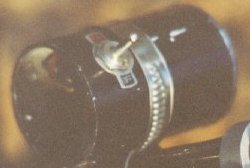 |
My mount is simply two hose clamps, one around the pipe and the other looped through the first and around the bars, with a bit of old inner tube to protect the bars and secure the light more effectively...
"in the dark again, just cain't wait to get out in the dark agin"
My first test was with the seedling pot, which was too thin and brittle - when I adjusted the angle of the beam, the pot cracked, and had to be taped in position so I could use it. I also found it was hard to tell when the light was on. Due to the similarity of beams, there was a lot of overlap, and without looking at the light, it was difficult to tell if both were running. Apart from the problem of blinding car drivers, I was worried that I might flatten the battery prematurely. The old light was easy - no housing, so the globe shone like a beacon whichever angle you looked at it.
The pot was binned and the pipe in place for the second test - strong, and because it wasn't plugged (yet) it was obvious when it was on. Because I had only put on a thin coat of paint, some light leaked through the sides of the pipe also. I might drill a hole in the top of each pipe for a basic on/off indicator, and maybe even a coloured insert (!!) before this version is finished.
The final flaw was the globe's spread. I'd wanted a 12 degree, and the more I checked, the more convinced I became that it wasn't. Comparing it side by side with the existing light, I felt I'd been sold a 20 degree or greater - certainly not as broad as my old 38 degree floodlight, but there was definitely more light shone to the sides than with the 16. It still makes a big difference, especially off road, but it wasn't what I'd expected.
In use, it's brilliant, and the wider beam may be a feature, rather than a flaw. To test more fully, I'll convert the original to a Mk II, and use that as the high beam - so the wider beam will be the general use broad beam. If I decide I do want a narrower spot... hey, it's only another $4.95, and I've already got a housing or five...
Can't wait to hit the Oaks singletrack with 40 W blazing the way ahead - I wonder if they'll be illegal during total fire bans? ;^)