
|
|
| |
|
| lights | mtb video | rides | links |
HahhAhahah! I can see. I can be seen. I can ride f-a-s-t on and off road, at night.
....you can too.

The Mk II version of these lights is now available, and doesn't cost much more to make. Mk III, using towball covers for housings, are the latest and greatest. The Mk III's look quite (almost!) professional.
$$ Cheap to lots.
Light - Yeah, really? I bought a 12V 20W halogen spotlight from Bob Moore's Lighting Warehouse (one of those places with the cheap, crappy late night ads - any one will do). There are choices in power and beam spread - my current version has a 16 degree spread, my last version was a wider 38 degrees, but the light didn't throw as far, or as brightly. Jaycar sell a cheaper light ($5.50), in 12 and 38 degree beams.
[Update 2000: I'm now buying globes from electrical wholesalers - better quality than Jaycar, and cheaper than the warehouses ($6.05) - look for heavier glass brand name globes with good reflectors]
Make certain you get globes with a glass cover to keep water and stones out. The covers on these globes don't seal all the way round, but this isn't a problem - I've had water splashing about inside during heavy rain many times, and it have never blown a globe. You can paint the back of the globe black to stop light reflecting in your face if it's a problem - with where I stuck mine, the bars block the light from hitting my eyes.
$$13
Battery - I went for a big mutha from Dick Smith's Electronics (again , any of the electronics chainstores or mail order should be able to help), 6.5 ah sealed lead acid (SLA or gel), which weighs, wait for it... 3kg !!! The same size now comes in a 7 ah version. I started with a 2.7 ah battery that probably only weighed about 1 kg, but it didn't last as well. You could also buy nicads, which are lighter, but considerably more expensive. Batteries pic The big mother should give me well over two hours solid run time, in the worst of conditions. Batteries don't last as long when it's cold, or when they have a high load.
The formula for calculating battery life for your lights is P = V x I, or Power in Watts =Volts times Current in Amps (oh all right, I don't know what I stands for!).
For my 20W setup this is 20 = 12 x I or 20/12 = I, therefore I= 1.66 amps, giving a theoretical battery (6.5 ah) life of 3.9 hrs. There's a trick though - if your current is more than one tenth the battery's capacity (more than 0.65 amps in my case) you have to derate by 20%, meaning I only get 80% of my theoretical maximum - now it's down to 3.1 hrs. The last ripoff is cold. Once it gets cold, you need to go down by another 20% - that's 80% of your last 80%... I'm now down to 2.5 hours. If I allow some slack in case of breakdowns or other delays, I've still got two hours of bright light and plenty in reserve.
For a 50W globe the figures would be 1.56 hrs max, 1.24 hrs derated for current and 1 hr for cold - 45 minutes with slack.
35W would give me 2.2 hrs max, 1.78 hrs for current, 1.4 hrs for cold and 1 hr with slack.
The 2.7 ah battery and my current 20W would have given me 1.6 hrs max, 1.28 hrs for current, 1 hr for cold and 45 minutes with slack.
Most of the time the 2.7 ah would easily meet my needs. One somewhere in the middle would be ideal, or maybe I should just buy a 50 watter!
Umm, don't mount a heavy battery on your rack - ask me how I know...
$$20 up, depending on run time (ah).
Charger - My first charger cost around $30 from Dick Smith's. After the original died from mistreatment, I discovered I had an old Sega Master System power pack with a broken output plug in the Pit, and it was putting out just over 12V (around 13-14V) at a slightly higher amperage than the real charger - perfect for the job.
$$Depends on what's in the garage - up to $35
Battery Mounts - Back to the Pit for me. I chopped up an old plastic Cateye bidon cage. Battery.jpg When I had the original smaller battery, it fitted in a heavy duty wire type bidon cage without modification.
$$10 (cage)
$$Rest depends on what's in the garage - less than $20
Light Mounts - Geez my Pit is wonderful... More old bits and pieces, bent and twisted into appropriate shapes, some tape and a worm drive type hose clamp were all pressed into service. Light.jpg. Mounting lights to bikes is a question that often pops up on the mtb-oz mail list, and one of the mtb-ozzers, Stephen Doggett, supplied the details of a commercial alternative:
"Since the question
of how to mount home made lights to handlbars
often pops up, here are the details of the Cateye bracket and mount.
Brand: Cateye,
cat.no.: #533-8598, For Model HL-1500 &
HL-500, Bracket & Spacer Set, Model H-24 (cost about $15-)."
I've never tried them, but at that price, they'd have to be worth a look. Figuring out how to mount the light onto the bracket may be another matter, and one that I'll leave to your ingenuity.
$$Depends
Etcetera - Bits of wire, connectors, tape, nuts and bolts were all in the Pit.
$$You must have this sort of stuff, surely. It's cheap if you don't anyway.
Cost To me - Less than $100 (Oz) The cheapest bright production lights I have seen have been around $150, and don't have near the power of mine. I could upgrade mine to two lights (maybe a spot and a flood) or even a 50 watter, for very little extra cost, but the battery obviously wouldn't last as long (and I'd blind car drivers completely). You could do it for less, depending on what's hanging around the garage, and how long you want your battery to last. By way of comparison, I was checking out the NiteRider brand at a recent bike show - the cheapest quoted by the salesman was $299!!! (less than 20W too!) Then again, the NiteRiders are professionally built and look it. Show or go? It's your choice.
history
i once had to commute to the station by bike, and it didn't take long to discover that the valleys of the Blue Mountains got dark when the sun was gone. I had no idea where the road was going - something had to be done. I was on a roadie at the time, so the obvious thing seemed to be generator lights - the modern quiet(er) kind that rolled on the top of the wheel (Sanyo Dynapower). Great! As I tore down the hill the road lit up before me - it was wonderful. Unfortunately, as I climbed up the next big hill at my usual pace (slow) the light faded to around 1 candlepower, as the darkness once again swallowed the road. I never could get the light bright enough on the climbs, and found I was regularly blowing bulbs as I flew down the hills. Hmmm.... Still, I'd done me dough and had to cop it for a while....
I never really enjoyed that roadie, sore bum, couldn't ride on the dirt, low bars, blah blah... and eventually scored permission to buy a mountain bike. I whacked the generator lights on the bike and went for a burn. God. "Where's the bloody jumbo?" What a racket! Because MTB's have knobs on their tyres, the generator was emitting the most outrageous noise - people would stop and stare as I approached from the distance. The generator also put an incredible drag on the tyres, it was just like riding with my brakes on, and I was slow enough as it was - going up hills now meant the filament barely glowed. Aaaaww shit...
Next try was one of those Cateye style, battery powered, 2.4w halogen handlebar lights (Soubitzen(sp?)). Quiet, much brighter going up hills, looked cool enough, I could be seen or see where I was going. Yeah. OR! If I angled the light so I could see, car drivers ignored me, if I angled the light at their eyes, I couldn't see the road. I killed batteries so regularly, I started taking spares on every ride, and only used the light when it was absolutely essential, hardly what I wanted.
Back to the drawing board.
Someone told me about this bloke who'd converted an old Dolphin torch to a headlight, using the reflector and battery only, which started me thinking. The batteries for these torches were big and lasted a long time, fit perfectly in a bottle cage, and put out 6v, giving a wider range of bright globes. Maybe... I tried wiring it up using the handlebar light and a new globe, which worked until it shorted spectacularly, and the contact plate vaporised! N-e-x-t! I dug out the old generator light reflector and rigged up wiring to the battery, connecting with alligator clips. This worked quite well, particularly when I changed to a 6w globe. Still not enough to go offroad comfortably, or to travel along a dark road at more than 40 kmh, but adequate - I could see and be seen. Problem was, I was going through 2 batteries every fortnight, and the cost was mounting.
While searching for info on how to do it, I visited the newsgroup rec.bicycles.tech and found "Building Your Own Bike Lighting System" Brad Grande, 1991. Back then he was at grande@cbnewsd.cb.att.com. I also found Arnie Berger's <arnie@col.hp.com> "The Ultimate Home Brew Bike Light". It sounded like these designs worked, looked good and were cheap. Trouble was, it all sounded to hard and professional for me, especially Arnie's - they sounded fantastic! Still, I knew i could build a cheaper, shoddier looking version with ease, and started pricing materials.
The result is the light you see today. Very bright - cars flash their headlights at me, thinking I'm on high beam, they wait at intersections for the motorbike to go past - embarrassing really, especially when I'm slowly struggling up a hill. I can see. I can see, very well in fact, and can ride faster over some off road areas than I can in the day, thanks to the way the light's shadows highlight all the bumps - I can take the smoother, faster line. Fast cornering in the bush can be a bit exciting as I'm now running the narrower 16 degree beam, but tunnel vision is a buzz. I don't start to outrun the light onroad until I'm going over 60 kmh, and it's still reasonable at 70. Offroad (bumpy winding fire trails) it's probably good for 40 -50 kmh, maybe a bit more - that's pretty fast in the conditions. Yeah, it looks a bit cheap and nasty, but who gives a rat's? It works. If you do give a hoot, the light can be easily made flashier, just put in a bit more effort, and maybe some more $$. Find Arnie Berger's version for a professional look.
Oh OK.
First, search in your garage, your shed or your pit to see what you've got that you can use - it doesn't have to be what I used, use your imagination. Then, scab some more bits off friends and rellies. Finally, buy all the bits you couldn't find or bludge.
Start charging the battery - when new, they need a long time on the charger to be fully primed - my battery needed around 24 hours before it was ready. It's really good if you have a power point near the bike, so you can charge the battery without pulling it off the bike.
Connect your wires to the light. The wires need to be long enough to reach your battery comfortably when the bars are at full lock - when you fall off you don't want to break the wires. This was probably one of the hardest parts for me, because the solder wouldn't stick to the pins hanging out the back of the light very well. I ended up roughing up the pins with wet and dry and using lots of flux and too much solder. Swearing helped. I found out later that you can buy special connectors to make this easy. D'OH!
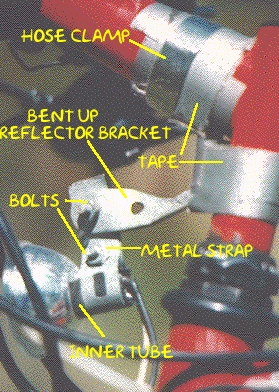
Mount your light. You'll need to bodgie up some brackets now. I used some old metal strapping that I bent so I could clamp it around the light globe by tightening a bolt through both ends. Before I fitted this to the globe, I wrapped some inner tube around the end of the light globe (where it would be clamped) for extra grip and vibration protection. I bolted the clamp strap onto a twisted reflector bracket, that I clamped onto the handlebar mount with a radiator hose clamp and some tape. I guess a picture explains it better...
Mount your battery. As I said in the material section, I used an old plastic Cateye bidon cage that I chopped so the battery would fit, and lined it with a bit of old motor bike inner tube. The battery sits on the rubber tube in the cage, mounted to the front down tube. To keep it in place, I wrap an old rubber battery strap off a motor bike around the battery and the bike's down tube. The strap is held tight with two plastic cable ties - the zip type. I've taped an old rubber shock absorber washer from a car to the frame to help reduce battery vibration. Battery.jpg I have seen pictures in a mag of the same battery as mine mounted on a bit of aluminium strip that was connected to the bidon mounts on both down tubes. Figure something out that will work with the materials you have found.
Put some connectors on the ends of your wires that match the ones on your battery - you'll probably need the female spade type, both my batteries had male connections. Tidy up a bit (but don't go overboard) by using cable ties to keep the wires close to the frame.
Is the battery charged yet?
Well, what are you waiting for?
The BikeCurrent Mail lists FAQ
The BikeCurrent mail list itself
Newer models!
the fat hippy's home made bike lights - Mk II
the fat hippy's home made bike lights - Mk III
Article
and all images copyright Tony Fathers
All commercial names and trademarks are
owned by their owners,
and are used only for illustrative
purposes.
Both article and images may be used by anybody
for
non-commercial purposes.
If it's commercial, you have to pay me.
Email
me for details.
![]()
another
fAt hIpPy production