
|
|
| |
|
| lights | mtb video | rides | links |
Strewth! I've been flat out making lights just recently, but I think the mk III's are the definitive home made set.
This time I've used a towball cover for the housing, and the result looks quite professional - far, far better than the el cheapos (mk I) and a big improvement over the mk II's, yet the increase in cost was bugger all - $2.40 for the towball cover, $2.95 for a switch plus a bit of PVC pipe that was leftover from the mk II's. My brackets still look a bit cheap (and they are) but they work well, and retain the light very securely. Most importantly, they continue to prove that any boofhead can make their own bright, effective lights at a fraction of the cost of bought ones.
Note for 2000: The mk III's have been superseded by the mk IV's - no housings, but very slick looking, and even easier to build than the mk III's.disclaimeR:
I'm still not an electrician, and still don't offer good advice. These lights work for me. Riding mountain bikes is dangerous, and even more so at night. Remember to ask your mother if you want good, sensible advice...
materialS:
So you don't have to flick between versions, here's a list of all the materials used and prices I paid. All prices are in Aussie dollars - duh!
toolS:
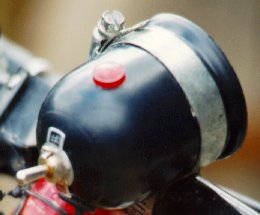
I drilled a hole in the end of the towball cover and one in the side - one is for the switch and one is for the wires to come out - it doesn't matter which is which, I've used both in different versions. Think about where you will mount the light on the bike, and locate your switch and wires accordingly. The holes are just big enough for the switch mount to go through (I fitted a grommet in the one for the wires).
The next step was to wire up the light and switch - think about where the battery will be mounted and make certain you use enough wire to reach - the less joins, the less potential points of failure. I couldn't use the little ceramic sockets to wire the globe, as there wasn't enough space inside the towball cover - your covers may be longer, your switch smaller, or maybe you won't recess your globe as much. This meant solder, which is a pain in the rear end to get to stick to the globe's pins - I ended up roughing them up with wet and dry paper before fluxing, which worked. The negative wire can go straight on the globe, the positive wire should connect to the globe via the switch - one wire from the battery into the switch and one wire out to the globe. Again, I used solder to connect to the switch, but you can get proper connectors. Use a fuse to prevent horrible shorts and damage to the lights or even the bike. The fuse should go in-line on the positive wire. I used shrinkydink tubing to cover both wires running out of the towball cover.
The actual internal diameter of the towball cover is considerably more than 50 mm - about 53 - 54 mm, so the globe needed to be secured somehow. Initially, I cut a short ring from the PVC pipe that was left over from the mk II's (about 20 mm long, but 10 mm would be plenty). The ring fitted snugly into the towball cover, so I just used some silicon sealant to secure it into position. I positioned the ring so that when the globe was fitted, it would be slightly recessed into the cover, so there would be no light shining into the rider's eyes. Once everything was wired, I fitted the switch and then used more silicon sealant to glue the globe in place. Wait until the sealant sets - the stuff I used took 24 hours. On my second light, the solder failed after I'd glued it all together, and I realised that the globe needed to be easily removable...
I now use silicon sealant to glue the globe to a 20 - 25 mm PVC ring. The ring fits fairly securely into the cover with the globe attached, and my mounting brackets (radiator hose clamps) hold the globe and mounting ring in very securely. If the switch, globe or solder fail, it's easy to remove them for fixing.
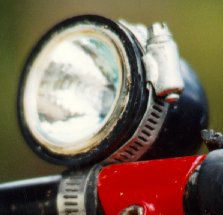
Voila! For a mount, one radiator hose clamp around the towball cover, and one looped through the first, then around the bars. To protect the bars, I cut a small strip of inner tube, which fits between the bar and the clamp.
That's it. Plug in your battery and away you go.
Pretty simple, and the end result looks pretty good, if I do say so myself.
problemS:
As I said above, towball covers don't have much room for everything to fit - I found I couldn't use the ceramic clip I'd bought to connect the wiring. The lack of clearance combined with me pushing the globe in too far allowed the globe's pins to contact with the switch pins and short spectacularly! The globe pins actually pushed right through the heatshrink tube I was using for insulation. This only happened on one light out of the four mk III's I've made so far and wouldn't have been any more than a blown fuse if I'd found that fuse link and used it... The other lights all have just enough clearance (different type of switch with smaller pins). Be careful!
If
you want to be able to easily remove the globe so you can repair the light,
you'll need to do something similar to my mounting ring above - it doesn't
have to be secured with a radiator clamp - mtb-ozzer Tony Stott suggests
using some small screws through the cover and into the ring, for example.
The
only other problem so far is that the 2 x 20W lights I'm now running chew
the battery up very fast! This just means I save one for high beam
- they're individually switched, so I just switch them off if not needed.
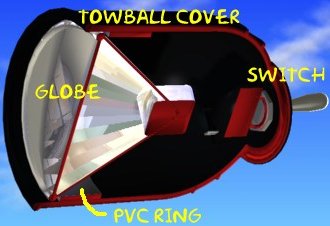
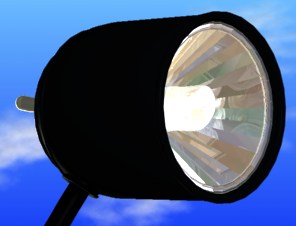
piX:
The
cutaway isn't the actual light, I've just modelled it in trueSpace3.1 -
I wouldn't be cutting up a real light for a photo, now would I???
 |
 |
|
|
|
 |
 |
|
|
|
 |
|
|
|
|
linkS:
![]() another fAt hIpPy production
another fAt hIpPy production
Standard disclaimer:
Unless otherwise stated, all
thoughts, comments, opinions etc expressed herein are mine, and should
not be taken to represent my employers, or for that matter, anyone else.
If you don't like anything I've said, sorry, just change the channel.
Copyright: Tony
Fathers, 1998 - 2006