
|
|
| |
|
| lights | mtb video | rides | links |
Yes,
it's happened, the Mk IV lights have arrived. I warned in one of my earlier
models that I couldn't stop tinkering, and I didn't...
[ parts ] [ battery mount ] [ what I did ] [ globe quality ] [ light links ]
While I liked the solid and dependable Mk III's, I wanted something more streamlined and stylish than towball covers. To be in tune with the new millennium (groan) the Mk IV's are streamlined and simple, while retaining last century's traditional qualities of low cost and effectiveness. The Mk IV's are also the first lightset I've made that require no soldering at all - all connections are made with purchased connectors.
 |
|
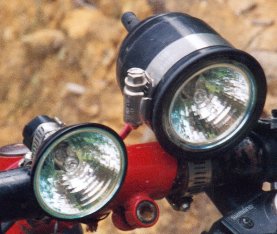
one
mkIII and one mkIV - as you can see, the mkIV is much smaller
|
While designing the Mk IV's, I decided to revisit and improve the Mk 1's, making the lights they should have been in the first place - less bodgie, well mounted, and individually switched. Housings were considered and discarded, as I couldn't find anything streamlined enough, and didn't want to use those little car foglights as housings (yet another alternative).
For your lights, be inventive - you don't have to follow my notes exactly - there are many alternatives that will get you the result you want - great lights!
| # | Description | $Oz |
| 1 | bike - you should already have this... | ?? |
|
2
|
12V 20W 12 degree spread halogen globes - better quality = more light for same battery drain (note on globe quality) | $6.05 ea |
|
2
|
"2 wires into 1" connectors (I used Posi-Lock™ crimpless connectors) | $2.95 |
|
2
|
ceramic clip on connectors | $2.75 ea |
|
2
|
radiator hose clamps (to wrap around bars) | $1.60 ea |
|
2
|
radiator hose clamps 8-22 mm (to wrap around back of globe - thinner width) | $1.60 ea |
|
set
|
6 female spade connectors | $5 or so |
|
1
|
roll wire - neater if you use the sort that's like two wires stuck together (technical term!) | $5 or so |
|
1
|
battery - cost depends on capacity - 7ah "brick" |
$25 to $39.95 |
|
1
|
charger - cost depends on model | $20 up |
|
4
|
rubber strips (for under hose clamps) - old inner tube | free |
| 2 | switches | $1.95 ea |
| 2 | switch mounts - could be hose clamps, tape, zip ties etc - I use zip ties | $2 or less |
| 1 | battery mount - be inventive! | ?? |
| can | heat resistant paint (optional but recommended) | $7 |
| tube | shrinky dink (heat shrink) tube (optional but recommended) - I had leftovers | $5? |
| 1 | fuse link (optional but recommended) | $3 |
All prices were accurate at the time of writing, but will have changed with the introduction of the GST. Of course, you could just use some of these ideas and reduce the cost further, and you may have some bits lying around at home already. Even if you have to buy all the parts, you should be able to build up an excellent set of lights, including battery and charger for around $Oz100. I still haven't seen bright commercial lights in Australia for under $200, and the really good dual light sets can run to over $500 for lights that are only as bright as home made ones.
Where to get the parts
Most parts will be available at electrical wholesalers or retailers such as Jaycar, Dick Smith and Tandy. Oatley Electronics also seem to be a good online source - especially for the batteries. Radiator hose clamps can be picked up at any servo and many department stores, who also sell spray paint. Shop around!
Tools:
No special tools are needed for these lights, all you'll need are:
I've seen a variety of home made battery mounting solutions, I use a modified Cateye bottle mount and secure the battery to the mount and frame with a rubber battery strap off an old motorbike and zip ties. My mate Hodgie straps his to his rack - and don't write off the humble backpack or bumbag.
I reckon the location of my mount is excellent - protected from rocks by the frame, and close to the centre of gravity so it doesn't upset the handling too much. However, I've got an older triangle type frame - there's nowhere on a lot of modern bikes to easily mount a battery close to the centre of gravity.
 |
|
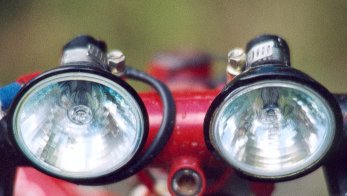
the
mkIV's fitted. I've since painted the clamps black & trimmed the wiring
to fit properly
|
Disclaimer: Although these lights work for me, I'm not an electrician, just this bloke who likes to tinker. Riding mountain bikes is dangerous, and even more so at night. Remember to ask your mother if you want good, sensible advice, because you won't get it from me...
So what did I do?
Pretty simple, really, the first thing I did was fit the ceramic connector clips to the globes, and sprayed both clip and globes black using engine enamel. Although the globes get very hot when you stop riding, I doubt they'll get as hot as a car engine, so the paint shouldn't have heat problems. Painting is optional but stops unwanted light shining in your eyes.
While the paint dried, I cut some lengths of wire and fitted connectors.
You'll need to think about where everything will be mounted before cutting your wires or you won't get the right lengths. The two longest lengths will probably be from the battery to the 2 into 1 connectors. If you're going to use shrinkydink tube to hold the wires neatly together, you'll need to slip it over the wires before you fit the connectors. D'oh! (been there, done that) Fit a female spade connector to the battery end of each wire and a 2 into 1 connector to the other end.
Next, you'll need lengths of wire to run from one 2 into 1 connector to both switches. My switches have male connectors, so I fit a female spade connector to the free ends of the wires.
The other 2 into one connector also gets two lengths of wire and female spade connectors on the free ends. The difference is that these wires connect to one of the wires on each ceramic clip instead of the switch.
The ceramic clips have two built in wires, measure the distance from where the globes will mount to the switch, and cut one wire to fit. Fit a female spade connector to this wire. Now measure the distance to where you'll mount the Posilock connectors and cut the other wire to fit. This wire fits into the Posilock connector, so doesn't need a female connector..
The ceramic clips are usually just a push fit onto the pins at the back of the globe. Simple.
the picture probably explains it better
To mount the globes to the bars, wrap one of the small rubber strips around
the "squared" section of the globe (I use a bit of tape to secure
it for the next step, but this isn't essential). Next, fit one of the two small
hose clamps over the rubber and globe (I "square off" the clamp so
it more closely matches the globe shape for a good fit - you should too). Loop
one of the larger clamps through this clamp, so it runs between the small clamp
and the rubber strip. Now wrap the larger strip of rubber around the bar and
fit the larger clamp over the top. Tighten it snugly, but not so firmly you
can't slightly adjust the light's angle by hand.
I angle each globe slightly differently, so that one is pointed a little higher.
This globe effectively becomes a high beam, the extra distance being very welcome
at high speed! When you are happy with the angles of your globes, don't forget
to tighten the clamps so they won't move.
Mount the switches to the bike using tape, zip ties or hose clamps. I use zip
ties, with one switch mounted on the head stem and the other mounted on the
bars above my shifter pod. This switch is positioned so I can hit it with my
thumb while riding - ideal for a high beam. I'd do the same with the other switch,
but there isn't enough room on my bars. My mate Hodgie has wider bars than me,
and has two thumb switches, which works really well.
Connect all the wires
as per the diagram above, mount your battery, make sure it's charged and prepare
to discover a whole new world of riding as you too become a demented
light head.
Problems/Issues
Pee UUU - these globes
get hot when you stop moving, and the paint smells - just turn them off when you
stop.
Make certain the clamp around the globe is tight enough so the globe won't
fall out! But be careful... I've seen a globe fracture, partly because the clamp
was too tight - but it also had no rubber, the clamp was too inflexible and
wide and hadn't been shaped to match the shape of the globe.
The issue of globe
quality has reared its ugly head. When I was building the Mk IV's, I used
one old and one new globe, and I was disappointed to note the new globe doesn't
appear to have the same quality of light output as the old. The old globe
is considerably heavier, with much thicker glass and the reflector coating also
seems "denser". The new globe came from Jaycar, and was just one of their
standard offerings. The old globe was branded EYE and I bought it from
a lighting warehouse - about $15 or so compared to $5.50 from Jaycar. I've
compared an older Jaycar globe with the newer one as well, and the older Jaycar
was much better than their latest offering.
I've since bought a better quality globe from an electrical wholesaler - John
R Turk was the wholesaler I used, but only because they happen to be in my area.
They stocked Thorn brand globes, which are heavier glass and have a better reflector.
This globe has much, much, much more light output than the ones I just bought
from Jaycar, and is almost identical to the original old globe. The best news
is that the good quality globe was still only $6.05. Bargain.
Don't
waste your money on low quality globes!
hmmm...
and after all that, I still like housings, you know... [wanders off thinking
and muttering]
![]()
another
fAt hIpPy production
Standard disclaimer: Like all outdoor activities, mountain bike riding can result in serious or fatal injury. Track conditions may have changed since these reviews. Don't ride beyond your ability. If you fall off it's your own fault. Unless otherwise stated, all thoughts, comments, opinions etc expressed herein are mine, and should not be taken to represent my employers, or for that matter, anyone else. If you don't like anything I've said, sorry, just change the channel.
Copyright © Tony Fathers, 1997 - 2006